
Concept Maps and How To Use Them
Concept maps help our brains take in information, mostly when there is visual information. The maps help us to see the big picture along with the connected and related data. They also help us focus on planning and making decisions of what we have learned and already know and what still needs to be learned and what we don’t know. The use of concept maps in conjunction with any text helps summarize the subject presented and offers a visual way to communicate that learning.
See also: Problem-Based Learning (PBL)
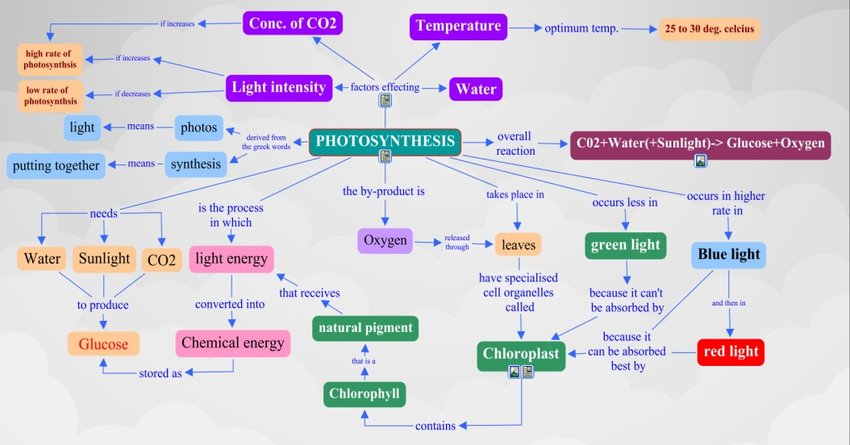
The technique of utilizing concept maps takes the specific information and shows it in an easy way with visual diagrams comprised of circles, boxes, and other shapes (i.e., nodes) that are connected by lines and arrows to show various relationships and connections of knowledge and concepts. They are also used to design advanced organizers in helping plan teaching and enabling student learning. Note the figure below of a concept map on the topic of photosynthesis.
Concept maps are designed with a range of difficulty, all dependent on the given topic (how the parts relate to the whole and also what information is not yet learned) along with the individual’s preferred learning style and understanding level. Thus, the information on a map varies to build understanding of the concept for the given audience. It is also essential to understand how these maps can enhance learning and how individual learners comprehend learning. Some basic ways to use concept maps in the classroom are beneficial.
See also: Just-in-Time Teaching (JiTT)
How Concept Maps Are Applied in Teaching and Learning
The concept map organizes a set of knowledge by visually displaying concepts and ideas and their relationships. First, you write keywords/phrases in various shapes and then connect these related ideas with arrows. A brief explanation of how these ideas are related is written by the arrow. Let’s look more closely at their value in learning.
- Helps with note-taking. For example, students can map assigned textbook chapters. Educational research supports the fact that students are more inclined to read the required material which is mapped. Teachers could assign so many points for the mapping that count toward classroom participation or a final grade.
- Aids in preparing presentations and lecture notes. Use concept maps instead of the written notes and outlines for an easier, and quicker visual aid.
- Assists with recording and visualizing brainstorming/discussion. Provide practice for your students in this way so they can sharpen their skills in concept mapping.
- Helps with visualizing timelines for activities and projects. To have a more personalized map, encourage the use of symbols and images besides just the text.
- Enhances graphics to written work and presentations when relevant to the content.
- Acts as a different technique to outlining or supplementing outlining by providing visual interest to the summarized information.
See also: Flipped Classroom
How to Create a Concept Map
- Decide on where to put the main idea (the question, phrase or word) on the paper in relation to the other information you plan to include.
- Begin with the main idea (the question, phrase or word). For example, “How does photosynthesis work?”
- Write other relevant and related concepts to make sub-concepts below the main idea. Put your ideas down quickly using circles and rectangles for each sub-concept.
- Analyze the map and categorize the sub-concepts. Consider coloring-in the sub-concepts with colored markers or pencils to help with thematically organizing.
- Connect the concepts and their relationships with arrows/lines.
- Add a short description of the relationship between the concept on each arrow/line. For example, in the Photosynthesis Concept Map, the line connecting the sub-concept “leaf” and the “sun” icon has the wording “is absorbed through” to show the connection between these concepts. The wording (labeling) typically consists of shorter words and does not need to be long like those seen in the Photosynthesis Concept Map.
- Revisit the map to see if it makes sense. Keep in mind, that concept maps can be unique as the person who created it.
See also: Bloom’s taxonomy
Not all students will know how to make a concept map, thus it is helpful to model how to do so in a classroom setting. When your students are capable of making a map, they can be used in many ways.
- Use for pre-assessment and instruct the students to make a concept map of what they know. As the information is presented, students can add and modify their maps to build understanding of the specific topic addressed.
- Use as a small group exercise. After presenting a problem, case study or key question about an important concept, put students in groups of 4-5. Each group is responsible of making a concept map as they take the information that they learned and add it to the new important concept. The students share their work.
- Use in a whole group setting. Create a map and use it to discuss related concepts and ideas on the map.
- Use to fill in the blank areas. A map is created prior to class that consists of the material to be covered in class. Then, delete some of the pertinent information and have the students fill in the blanks to reflect their learning.
- Use to organize research. A concept map will help you to organize and extend your research, add details, and find ways the concepts/details are connected and related. It is a great way to provide insights that may not be so easily known before.